
|
2/27/2021 0 Comments Baby Led Weaning vs. PureesOne of the most common questions I get from parents about to begin the journey of solids with their baby is: Which is better: Baby Led Weaning or Purees? Here's a quick overview to help you make the call on which feeding method is right for you and your baby. 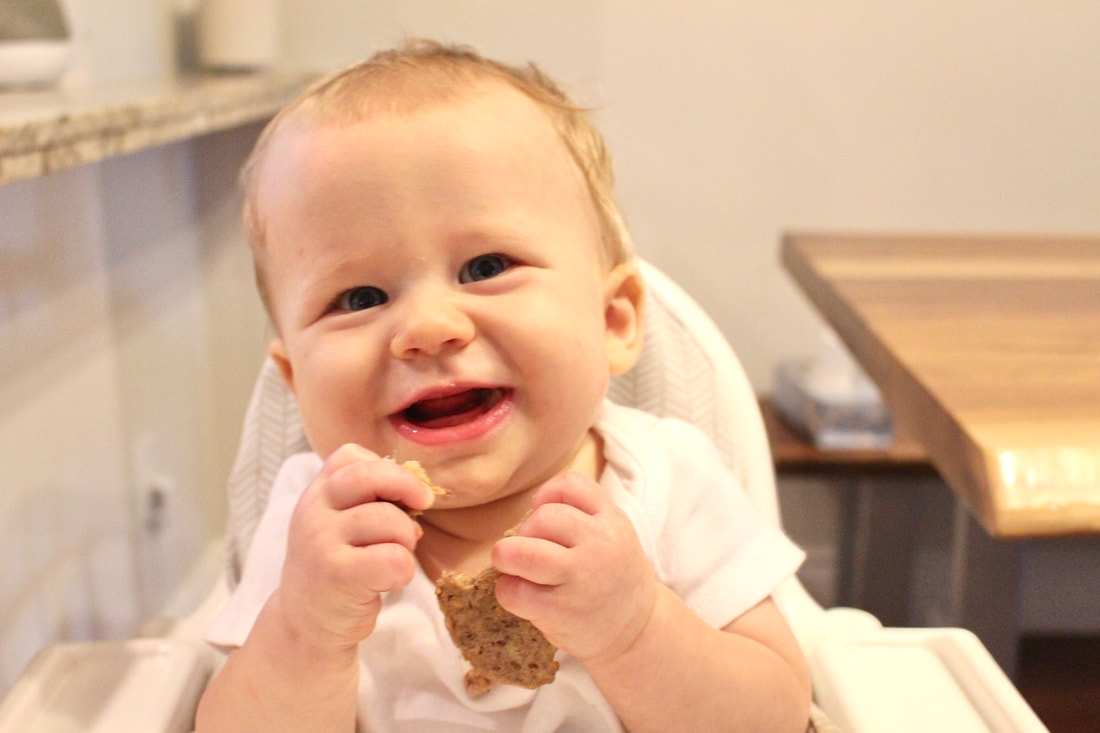 So, your baby is a few months old and you’re starting to plan their introduction to solids. A quick Google search… a visit to your paediatrician… a scroll through Instagram…. and you quickly realize there is a LOT of information out there. Some parents are screaming from the rooftops that Baby Led Weaning is the only way to go, while others are taking the more traditional route of purees. So which is best? Well, for the sake of time, I’m going to assume we all know what a puree is (blending up food to a smooth consistency, usually spoon-fed to baby). But, what the heck is Baby Led Weaning (BLW)? Simply put, Baby Led Weaning is the concept of providing baby with finger foods (soft foods cut into strips, to start) and putting her in charge. Baby chooses what to eat from the foods provided and how much. Parents play a fairly small role in comparison to feeding strictly purees, where they are an instrumental part in getting the food into their baby’s mouth.  So, let’s look at the benefits of BLW. It frees up the caregiver Selfishly, this is one of my favourite things about BLW. Since baby is in charge of feeding himself, mom and dad aren’t tied to the highchair until the meal is over, which means you are either free to do other things nearby (alway keeping an eye on baby for safety, of course), or able to enjoy a meal yourself. Which leads me to the next benefit… It allows the family to eat together If your baby is in charge of feeding himself, that means everyone else can also eat at the same time, which lends itself nicely to family meals. The more your baby can see you modelling good eating behaviours, the faster they are to catch on themselves. As such, the start of creating a beautiful food culture with your kids begins. "... the start of creating a beautiful food culture with your kids begins." Baby is more likely to follow their own intrinsic cues Because baby has control over what she will eat from her highchair tray, she will naturally lean into her own intuitions, reaching for more of one food over another, depending on her preferences; stopping when she is no longer hungry (babies are born with excellent hunger and fullness cues), etc. When you are spoon feeding your baby, it can be harder for her to listen to her own instincts around food. Food prep can be easier One of the concepts of BLW is often, “baby eats what you eat”, meaning everyone in the family eats a version of the same meal, and that can mean less food prep for you. That said, in the early days of food introduction, this likely won’t be the case, as it takes time to build up a baby’s food list, as well as food needs to be prepared in a safe way, suitable for a baby with few to no teeth, and offered in developmentally appropriate ways. For younger babies, this usually means strips, as they haven’t developed the palmer release or pincer grasp yet (ability to pick food up with index finger and thumb).  So far, it sounds like I am a BIG supporter of BLW, right? And that would be true. I am. BUT, that doesn’t mean I don’t think purees are a great idea. Because I really do! Hear me out: Purees offer a nutrition punch like no other You’ve probably heard the phrase, “Food before one, just for fun.” But through my own learning, I have come to strongly disagree with this statement. Food before one can be so powerful to a child’s development and has the ability to set them on the path to long-term health. Purees allow you to flex your inner nutrition geek muscles and really put some food combinations together that support your baby’s health in big ways. For example, I love making my gut healing broth, freezing it in icecube trays and using it to puree various vegetable, fruit and even meat combinations. In the early days of BLW, baby is not likely to get a large amount of food in her, but will probably take in more if the food is pureed and spoon-fed. This better allows for iron consumption, as well as minerals, gelatin, fats, and various micronutrients--all beneficial to your baby’s developing systems. You may have read on my Instagram page that, when the pandemic hit, I suffered a drop in milk supply (stress can do crazy things), and on top of that, my son developed an extreme case of eczema. At his four month appointment, we were told his weight gain had stalled and I had to make some big decisions about his nutrition. Ultimately, we decided to start him on solids earlier than planned, and I used purees to boost his overall health. Along with some other tools, this allowed him to gain the necessary weight and clear his eczema. Ultimately, the use of purees played a big part in his healing. So, it’s no surprise that I think they can be a great addition to your baby’s feeding regime. Although we took more of a BLW approach with my daughter, she also got purees! After all, smooth and silky is a food texture I wanted her to be familiar with as well. 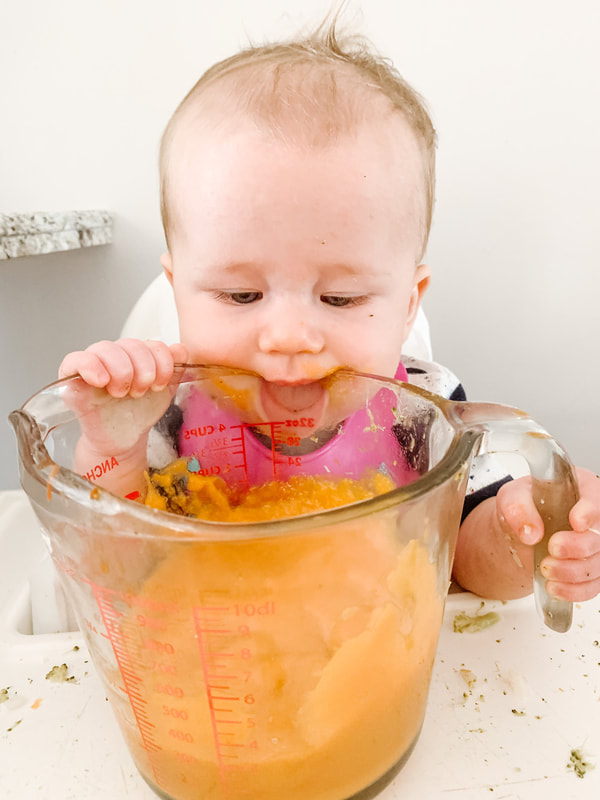 Tip: If you want to avoid feeding your baby, but still want to try purees, you can pre-load their spoon and offer it to them. I know what you’re thinking: “Lindsay, it doesn’t sound like you’re picking a side at all. How is this helping me choose between BLW and purees?” Well, here’s the secret: You don’t have to choose! If you aren’t automatically drawn towards one feeding method over another, you can totally do a hybrid of the two. In fact, that’s what I did with both of my babies! My kids had very different intro-to-solids journeys, and their needs and personalities meant they needed different things. Even if you feel very strongly about one feeding method, your baby may have different plans. Be prepared for and open to reading their cues and following their direction. This isn’t all about you, after all. Some babies want nothing to do with purees, while others are frustrated in early days with the concept of feeding themselves, and may do well with some puree offered before having them practice self-feeding. Pay attention to what your baby is telling you and let that guide your feeding journey. Looking for more guidance on introducing solids to your baby? Introducing my self-paced course, Starting Solids with Super Nutrition. Learn how to introduce solids to your baby with confidence. Click the button below for more info. Not ready to join a list, but want to learn more? Check out the video below all about WHY I created Starting Solids with Super Nutrition. 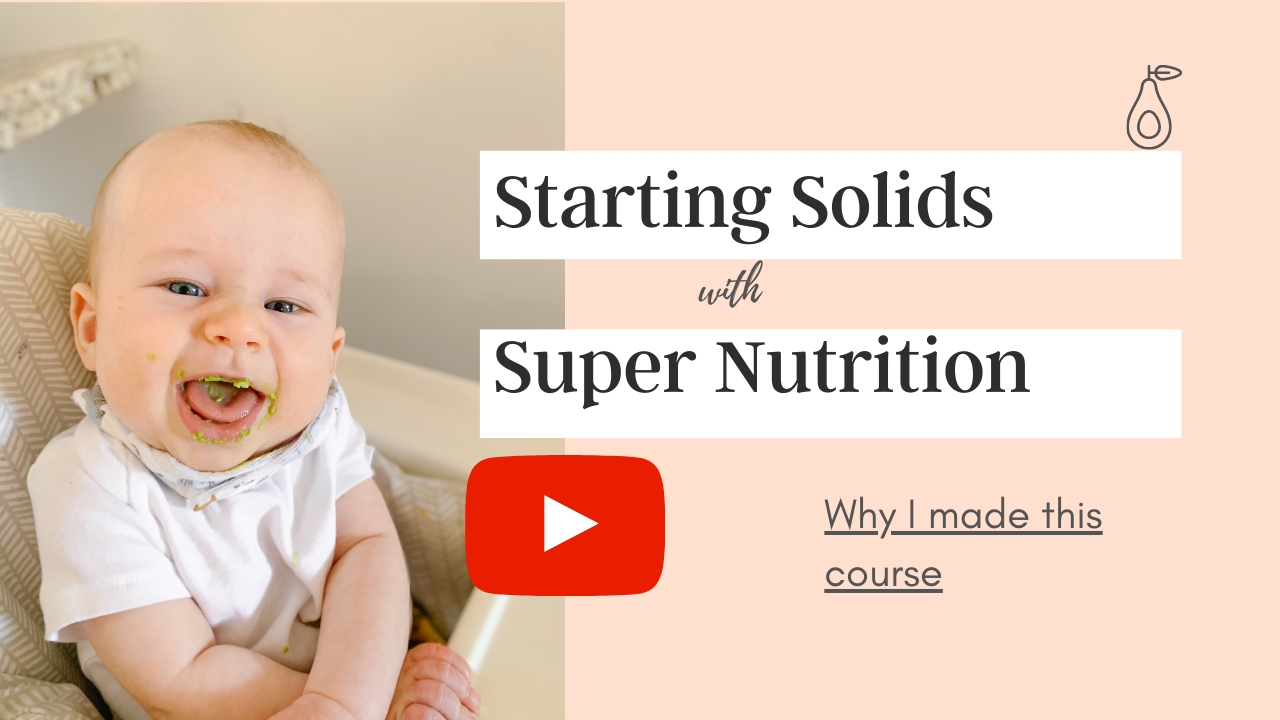
0 Comments
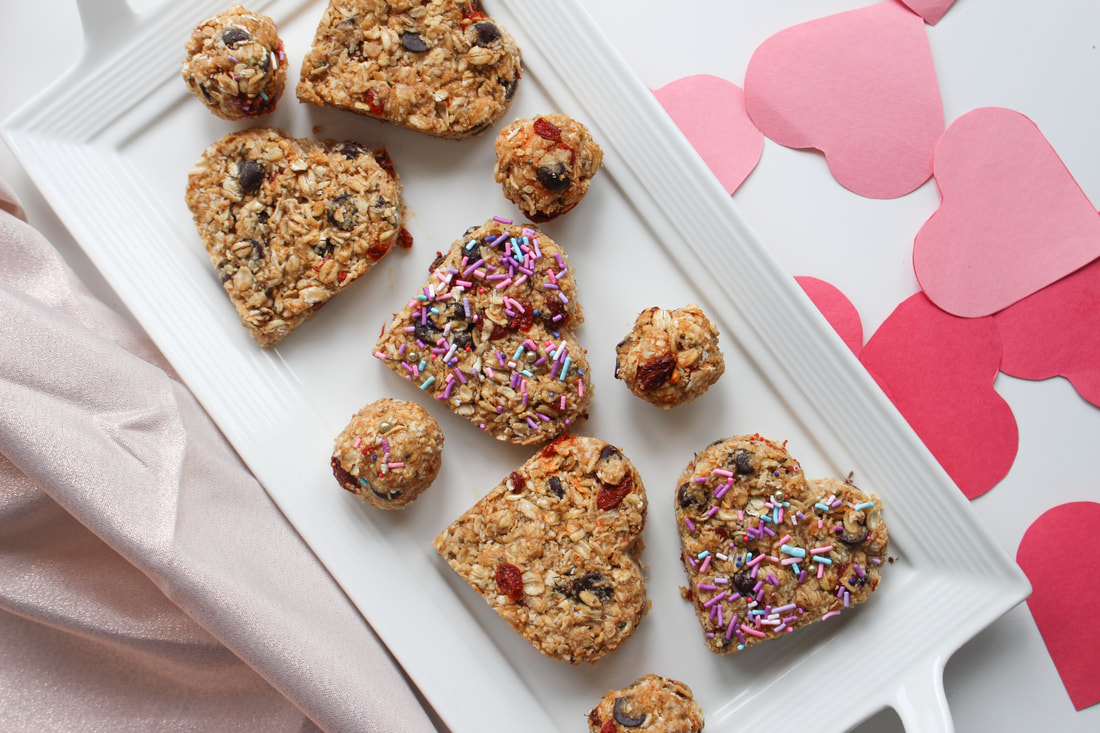 Ah, February: the season of love. I've never been much of a Valentine's Day enthusiast myself, but don't dislike it either. I fall somewhere in the middle, likely not playing a leading role with my participation, but happy to join in the chorus. Traditionally, Dave and I have been known to exchange a thoughtful card and make a nice dinner together with some wine. Pretty standard. Nothing fancy, but quite enjoyable, nonetheless. That said, I respect and admire the couples that really go all out with grand romantic gestures and dinner at a 5-star restaurant. As a busy, working mom, a romantic dinner sounds like a pretty nice option right about now. Whether you love or hate Valentine's Day, I think we can all agree that we inevitably associate the occasion with chocolate, along with other pink and red candy options. Now that I have children, V-day is a whole different ball game, since I now have the desire to include them in the celebrations as well. And since I need no excuse to play around with chocolate in the kitchen, this was a great opportunity to come up with some healthy Valentine's Day treats using real food that the whole family can enjoy. These are all easy recipes that include include chocolate (obviously), but are likely better options than most store-bought sweet treats. So, of course, I am sharing my creations with you here. All of these were easy to make using simple ingredients while still looking very V-day-esc. 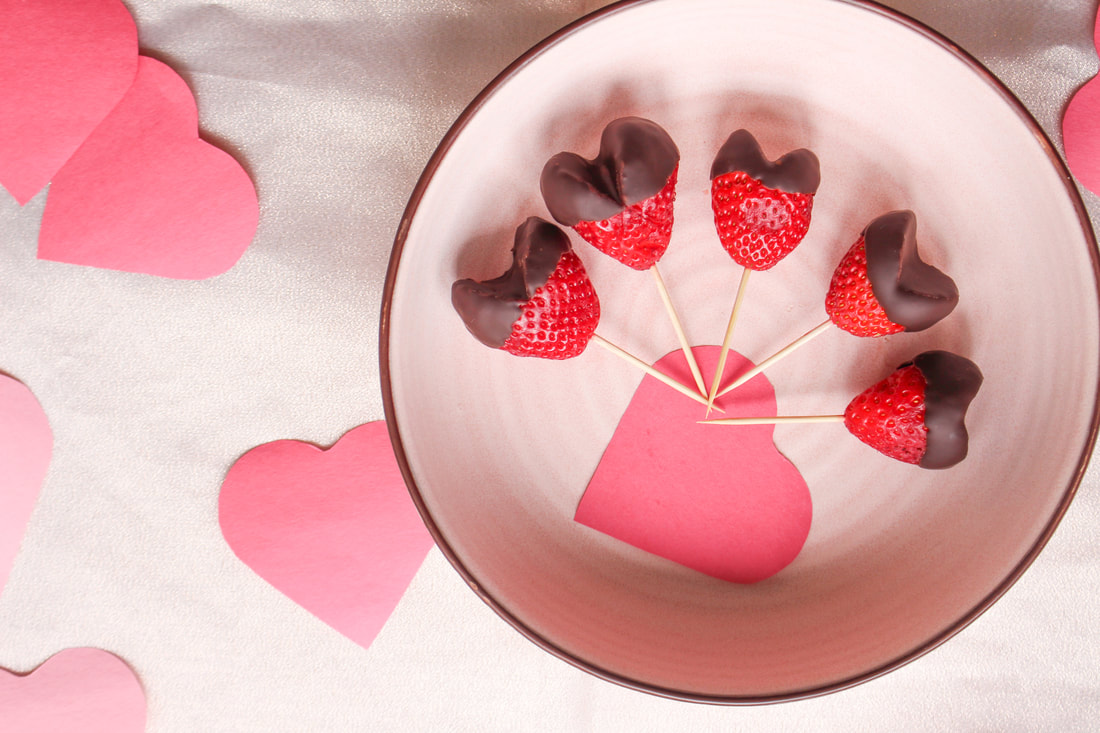 First up, when I think of Valentine's Day, I automatically think: chocolate-covered strawberries. You can never go wrong with fresh fruit and chocolate. But I wanted to make these a bit more festive and thought: wouldn't making them heart-shaped be the perfect way to achieve this? AND why not ad a cute toothpick handle? And here we are: a fun way to to create the perfect snack. Ingredients: 12-20 fresh strawberries 1/2 cup semi-sweet chocolate chips 1 tsp coconut oil Vanilla 1. Start by cutting the stem off of strawberries in a v-shape 2. In a double boiler, pour chocolate chips into a pot (I just used some dairy-free chocolate chips). Add the coconut oil and heat over medium heat, stirring regularly. 3. When the chocolate is melted and smooth, remove from heat and stir in half a teaspoon of vanilla. 4. Put a toothpick in the end of each strawberry and dip the tops into the chocolate. Place on a cookie sheet lined with parchment paper or a silicone mat. Place in the fridge for 30 minutes to set. Related: Chocolate Almond Butter Stuffed Dates  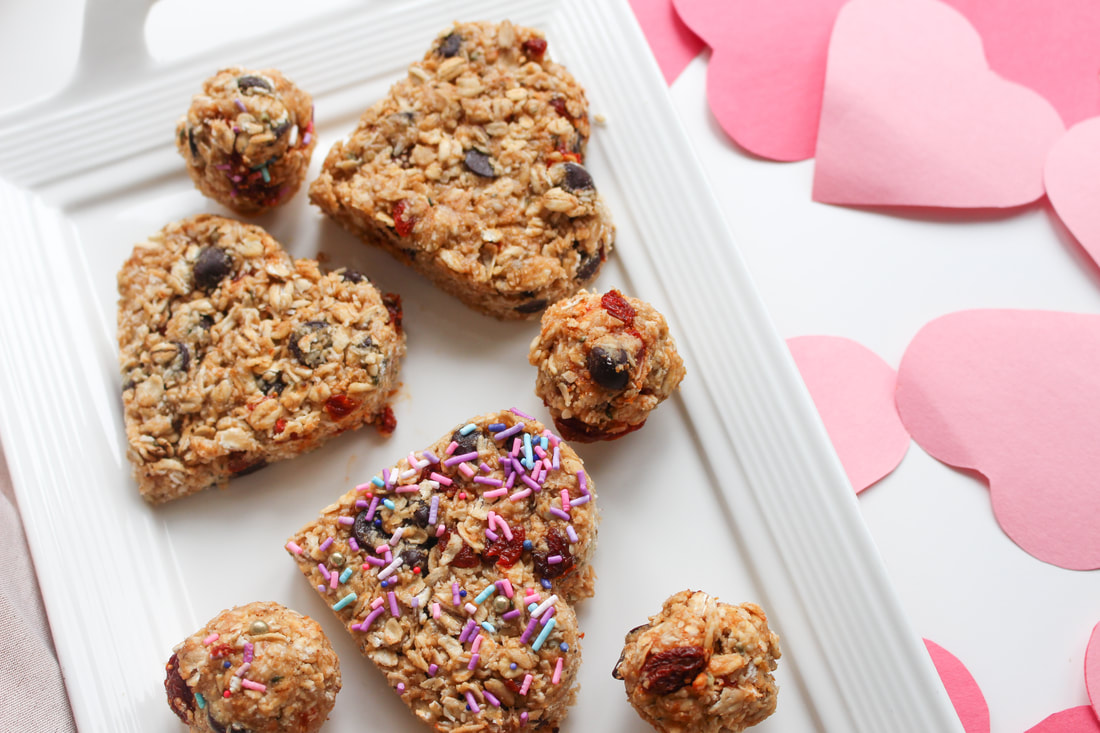 Next are these heart-shaped energy snacks (or energy balls). I love these because they can easily be adapted for school lunches by swapping the peanut butter for a seed butter to make a fun snack. Sweetened with honey means there is no processed added sugar. The only special tool I used were a couple of heart-shaped cookie cutters in varying sizes, which I picked up from my local grocery store. I plan to use the large one on Valentine's Day morning as well, a great way to make our pancakes a special treat. Bonus: this simple no-bake recipe can easily be adapted for any time of year, giving you a healthy snack great for families on the go, making it a favourite among parents. 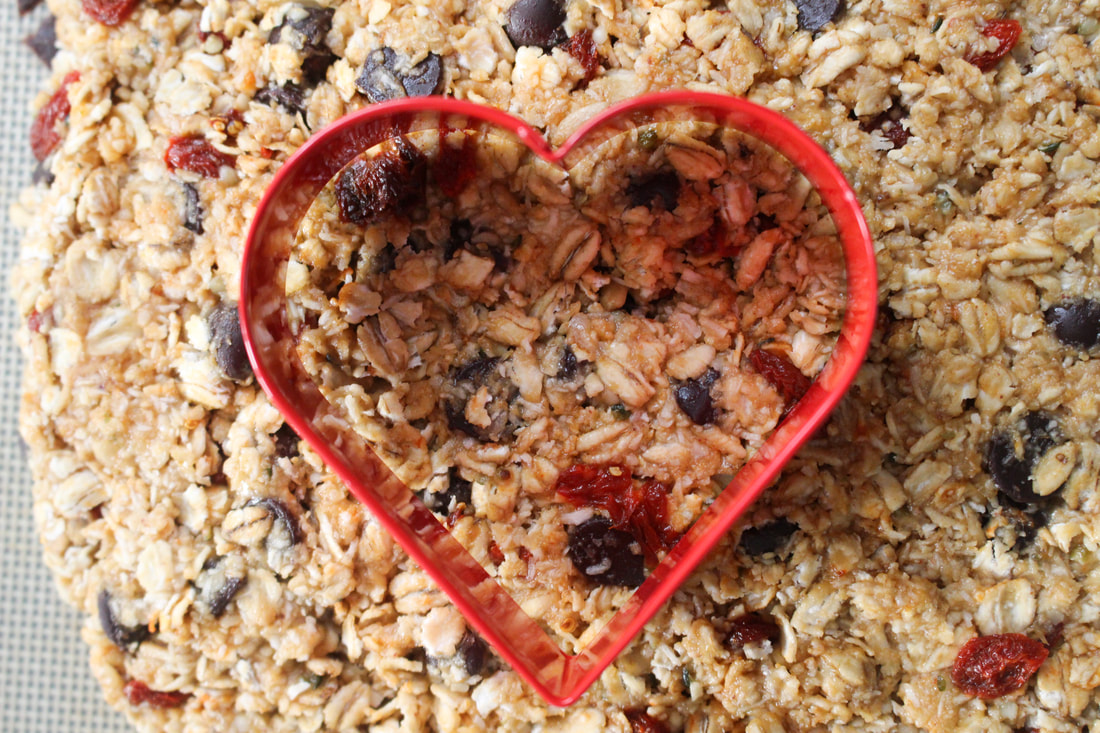 Ingredients: 2 cups oats 1/3 cup chocolate chips 1/3 cup goji berries 1/2 cup honey 1/2 cup peanut butter Sprinkles (optional) 1. In a large bowl, combine oats with chocolate chips, goji berries, honey and peanut butter. Stir until mixed. 2. Line a cookie sheet with parchment paper or a silicone mat. Scoop the mixture onto the sheet and form into a log shape, about 1 inch high. Gently press in some festive sprinkles into the top of the mixture (optional. I did this on half). If you don’t have a cookie cutter you’d like to use, you can skip this step and just roll the dough into balls. Fold the sprinkles in first, if using. 3. Place the cookie sheet in the freezer for half an hour. This will make the dough less sticky to work with. 4. Remove from freezer and use your cookie cutter to form heart shapes. I rolled my remaining mixture into balls. As these reach room temperature, they can lose their shape a bit more easily, so store in an air-tight container in the fridge or freezer. 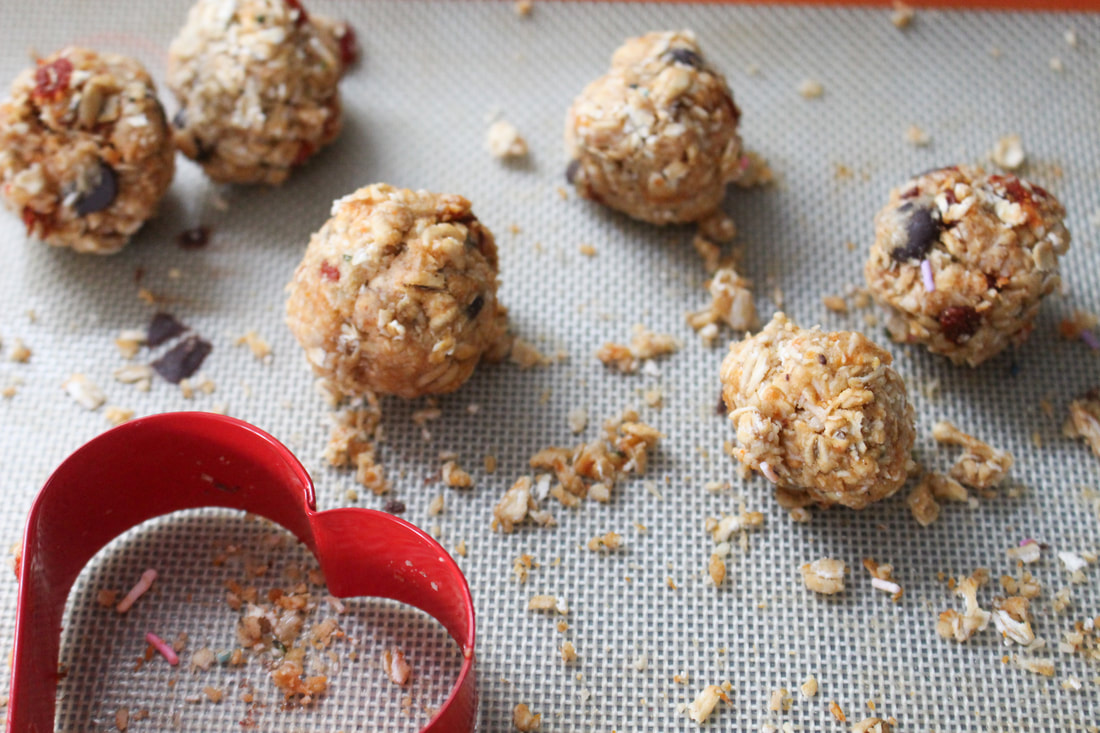 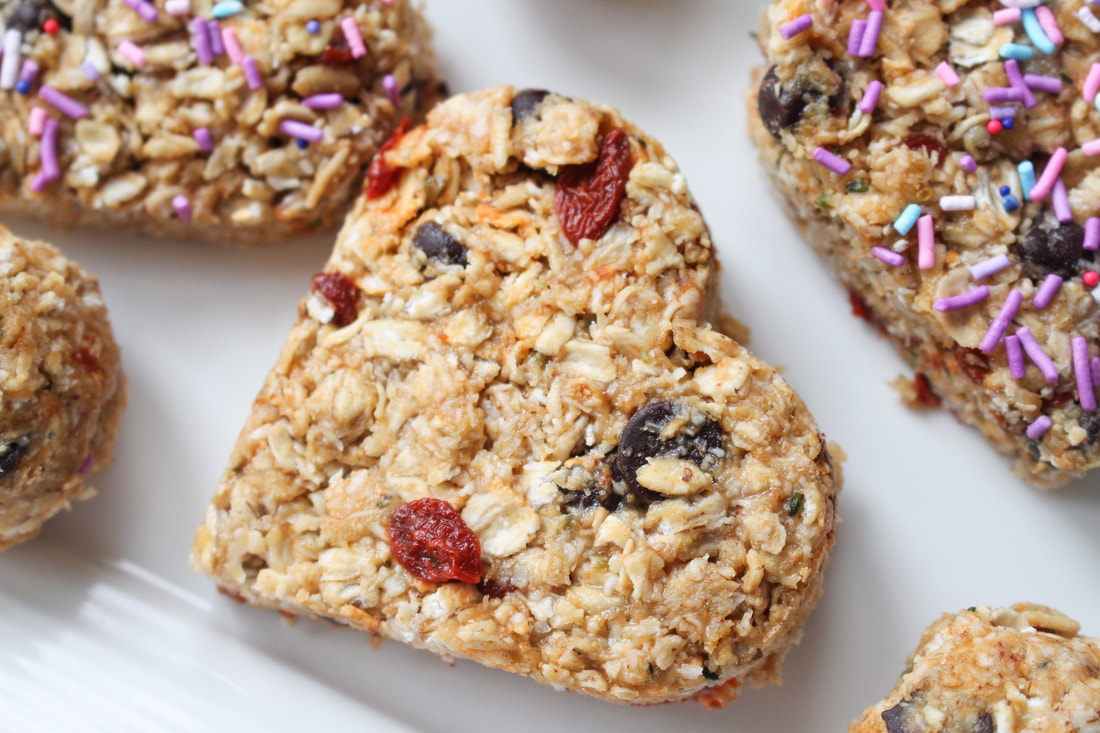 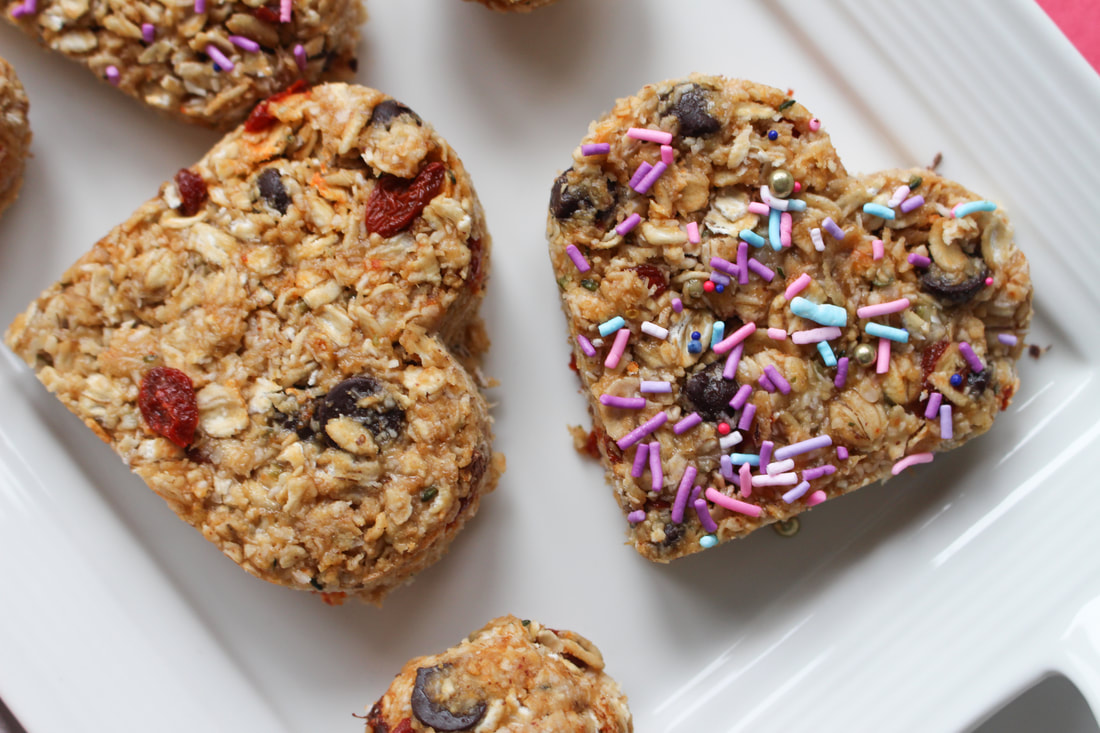 Finally, I have a delicious treat that will likely be used as my Valentine's Day dessert (primarily for Dave and I). Chocolate bark on any occasion is great because it looks impressive but is so easy to make. The simplicity mixed with decadence makes it the perfect dessert. I used my dehydrator to dehydrate some thinly sliced strawberries overnight. Alternatively, you can purchase freeze-dried strawberries, or use dried cranberries or goji berries instead to give you the festive red color. And although I haven't tried this version yet, pomegranate seeds would give a lovely tart flavor as well. But, I have to say, dried strawberries are so yummy. The best part about keeping a treat like this in the freezer is it means you have a sweet treat at your finger tips that stays fresh, but that's not always staring you in the face on your counter. So it might even last a few days before being completely gobbled up! 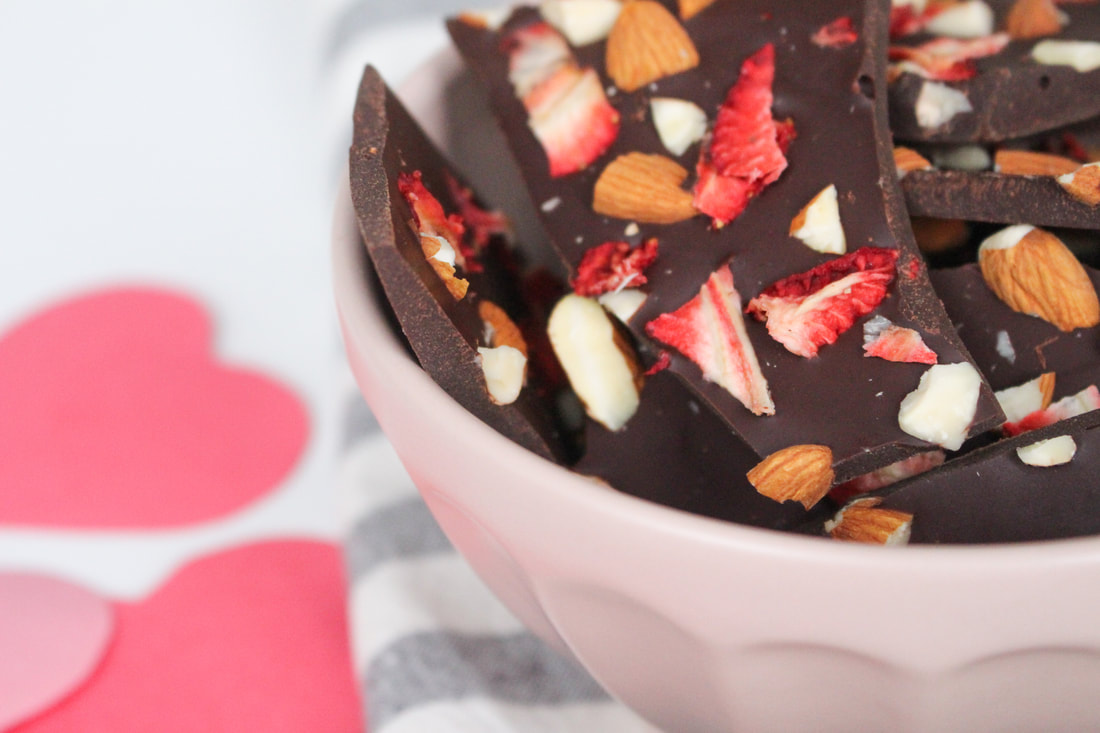 Ingredients: 1/4 cup of dried strawberries, cranberries or goji berries 1 cup dark or semi-sweet chocolate of choice 1/4 cup almonds 1. Melt chocolate over a double boiler, stirring constantly. 2. Line a cookie sheet with parchment paper or a silicone baking sheet and pour the melted chocolate onto the middle of the pan. Use a spatula to spread the chocolate out evenly to the desired width. I like mine fairly thin. 3. Roughly chop almonds and dried strawberries (or dried berries of choice). Sprinkle them onto the chocolate and lightly press down. 4. Place the pan in the freezer for about 30 minutes or until the chocolate is completely set. Remove the pan from the freezer and break your chocolate into pieces. Store in air-tight container (I like to keep mine in the freezer) and enjoy! 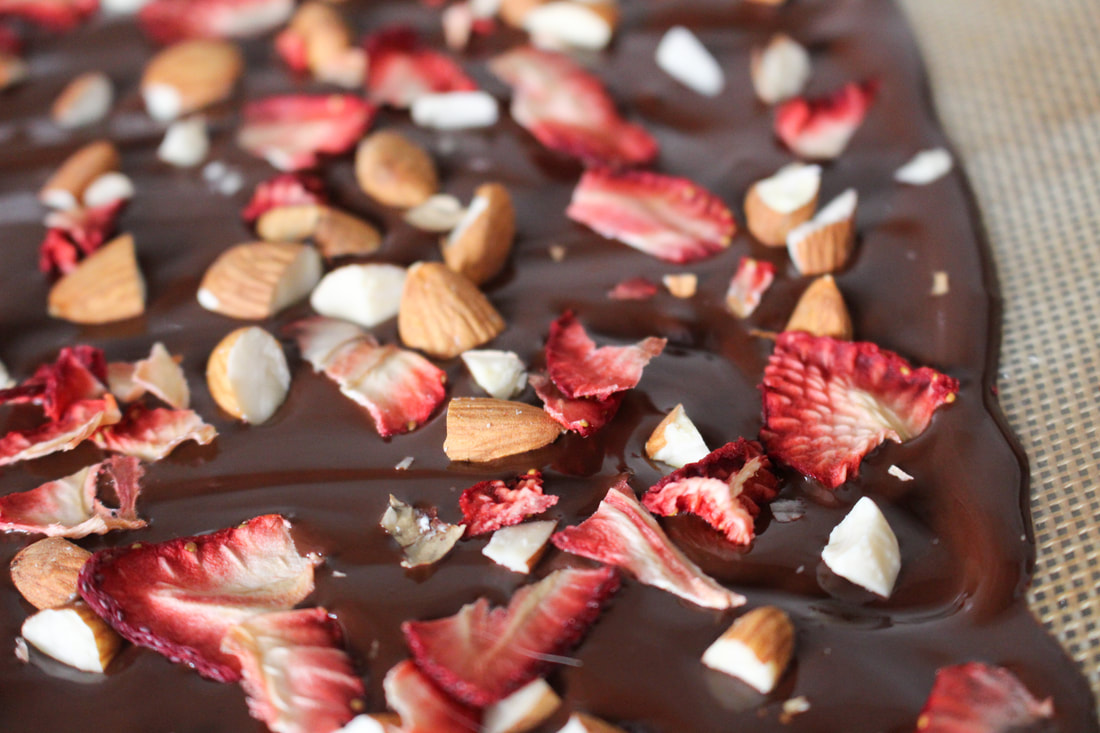 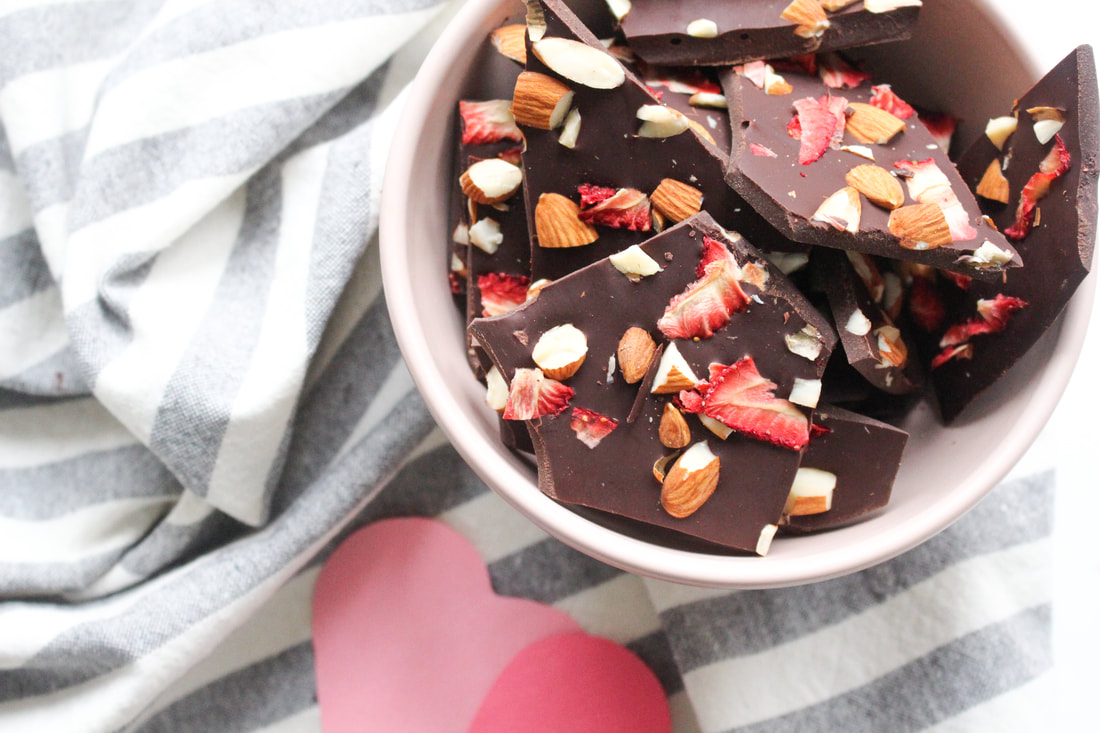 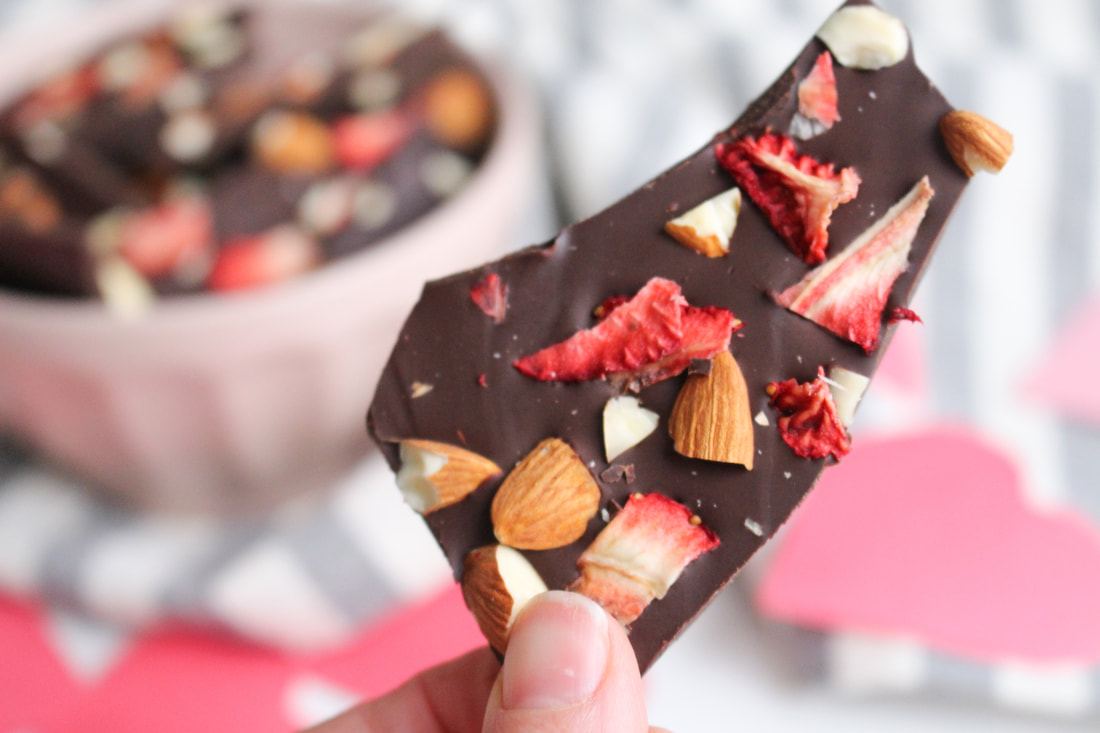 Special occasions are one of my favourite excuses to make festive treats using healthy ingredients, often ones I already have around the house, and Valentine's Day is no excuse. Let me know below or tag me on Instagram @lindsay.m.nutrition if you try any of these healthy Valentine's Day snacks.
Happy Love Day! |
|
 RSS Feed