
|
9/5/2015 1 Comment Real Food Granola Bars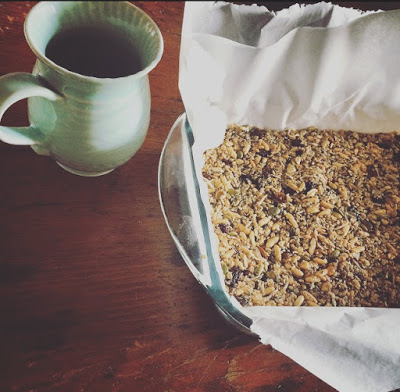 Grab-and-go snacks are important for those busy days. They're also handy to have around in times when hunger sneaks up, unexpectantly. Without good choices readily accessible, you're more likely to make a food decision you'll later regret. Recently I have been whipping up weekly batches of my own granola bars, adapted from Oh She Glows author, Angela Lidden's Glo Bar recipe. These little bars of deliciousness are made with real food and don't contain any of the unidentifiable crap found in many store bought brands. I'll be testing today's batch out on my almost-3-year-old niece and am fairly confident they will get the toddler seal of approval. Recipe: 1 1/2 cups rolled oats
1 1/4 cups rice crisp cereal 1/4 cup hemp hearts 1/4 cup pumpkin seeds 1/4 cup unsweetened shredded coconut 2 Tbsp. chia seeds 1/4 cup raisins (optional) 1 tsp. cinnamon 1/2 cup plus 1 Tbsp. 100% pure, local maple syrup 1/4 cup peanut or almond butter (substitute with soy or sunflower butter to make school friendly) 1 tsp. pure vanilla extract 1. Line a 9 inch cake pan with two pieces of parchment paper going opposite ways. 2. In a large bowl, combine all of the ingredients except the maple syrup, PB and vanilla. 3. In a small saucepan, stir together the maple syrup and peanut butter until well combined. Cook over medium to high heat until the mixture softens and bubbles. Remove the pan from the heat and stir in the vanilla. 4. Pour the mixture onto the dry ingredients and stir together well. 5. Transfer the mixture into the prepared pan, spreading it out into an even layer. Lightly wet your hands and press down on the mixture to even it out. Make sure it is well compacted. This will help ensure the bars stay together. 6. Place the pan in the freezer for about 10 minutes or until firm. 7. Remove from freezer and lift the square out of the pan, using the parchment paper as handles. Place it on a cutting bar and cut into bars or squares. I like to store my bars in the freezer or fridge. This helps them to stay together and maintain their shape until I'm ready to eat. (p.s. my comments section is up and running, so please feel free to utilize!) Happy snacking!
1 Comment
Vanessa
8/11/2016 08:04:39 am
Yum! Loved these. Leave a Reply. |
|
 RSS Feed